Powershell-With-WMI
Windows Management Instrumentation
Type in:
Look at the sytax..
What you have done is input the System.Math namespace and called the static method Pow().
Get used to the syntax; you will be using it again and again. Square brackets ‘[]'
around the fully qualified type name and two colons ‘::' indicate I am calling the static
method.
Let us another example, create a variable, set it to a string and then inspect its type. You may be familiar
with the GetType() method from C#.
Example
PS C:\> $abc = "Hello"
PS C:\> $abc.GetType()
IsPublic IsSerial Name BaseType
-------- -------- ---- --------
True True String System.Object
Set the variable $abc to a string, it is by using the GetType() method. This is becomes handy when running, tracing and debugging PowerShell scripts. You can find out exactly what type it is.
The purpose of this PowerShell training session is to introduce WMI. Like all the tutorials before it, I am going to introduce concepts used when scripting with WMI. Because of the vast amount of data available on WMI, I’m going to present just the basics needed to start working with it in your environment. This is part 1 of a 3 part tutorial which will cover the following:
- What is WMI, how to navigate the name space, how to collect information using properties of WMI classes (Objects).
Note: I have added Part 3 because of an issue I and others have run into with the scripts posted in the Microsoft Script Center. We are not able to use the “Out-File” nor the “>” redirect to send script output to a file (Like we did with VBScript). If you use a Microsoft script and attempt either of the following, the file gets created but there is no data.
-or-
Again, we will go over this in part 3.
What is WMI?
WMI is basically a database of information maintained on each Windows system. We connect to the WMI Service to query information maintained in the database. To visually see WMI on your system do the following:
- Open “Computer Management” from Administrative Tools.
- Expand “Services and Applications.”
- Right-click “WMI Control” and choose Properties.
- Click on the Advanced Tab. Notice: Default namespace for scripting by default set to root/cimv2.
WMI consists of classes that are made up of properties and methods that we can manipulate with PowerShell scripting. So how do we find out what classes are available?
Using a GUI Tool to Discover WMI Classes, Properties, and Methods.
Before PowerShell existed, VBScript writers used a tool called WMI CIM Studio which provided a GUI into the WMI hierarchy. In previous PowerShell training session we have examined how the “Get-Member” cmdlet allows us to view properties and methods of objects. I’m going to show you how both methods (WMI CIM Studio and PowerShell) are used to find Classes, Properties, and Methods.
The WMI Administrative Tools are available from the Microsoft website. I HIGHLY RECOMMEND DOWNLOADING IT!
After you have installed the WMI Tools, launch WMI CIM Studio from Start – Programs – WMI Tools.
- Allow blocked content – if your browser is locked down.
- You will be prompted to connect to namespace: make sure “root/cimv2″ is selected – click OK.
- Click OK to use your current user log on. Local Admin Rights are required.
- Click on the binocular icon to search for a class.
- In the search box type processor and click GO! for results.
- For now we are interested in the Win32 classes.
- Choose Win32_Processor and click OK.
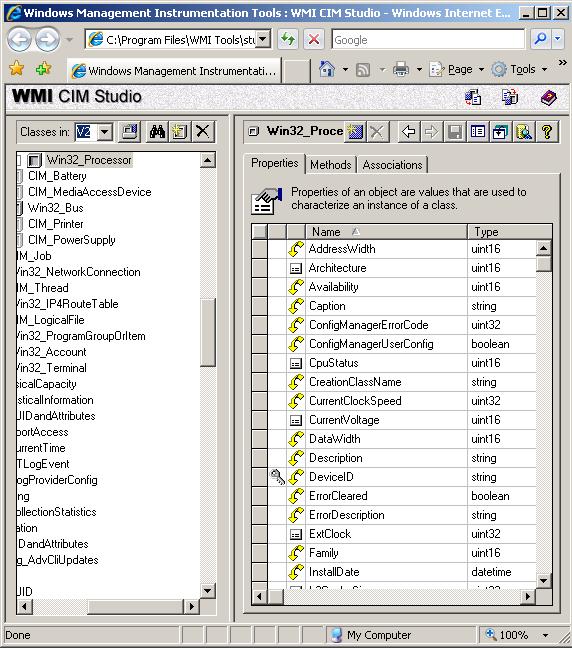
WMI CIM Studio
image 11.1
Image 11.1 is a picture of WMI CIM Studio Tool. The left pane exposes the classes available and the right pane shows which properties(tab) and methods(tab) are available for the selected class. In our case the selected class is Win32_Processor.
You can also use the WMI CIM Studio to connect to remote machines to discover which WMI classes are available. This is helpful as there are different versions of WMI and different classes dependent on which OS is running.
- Click “Browse for Namespace” button which is located to the right of the “Classes in” drop-down menu.
- In “Machine Name:” type the UNC for the remote computer (\\ServerName).
- Leave the “Starting Namespace” set to root\CIMV2. Click the “Connect” button.
- You are prompted to login as current user. If the current user is not an administrator on the remote computer, un-check the option and supply proper credentials.
- Once connected click OK.
To verify that you are connected to the remote server look at the “Classes in:” drop-down. It should read similar to the following: \\ServerName\root\CIMV2. Use the same methods of searching for Win32 classes as done in the first example.
Starting to see the power of the tool? Take a few minutes to browse, play, and discover. Let’s say you want to write a script that gets disk information but your not sure which WMI class you need to enumerate. Use the find (binocular) button and type in “disk.” Now you have a set of classes that you can examine. Try other searches like Server, Printer, Memory, and Network. What I want you to understand is that the “Tool” assists in finding the right class for any script concept you may have. Half the battle is finding the class, once that’s completed the script code used to enumerate and make changes is much the same. Meaning, you will use the same script code to work with any WMI object as I’ll show you later in this tutorial.
The WMI Administrative Tools were developed to help VBScripters and Programmers when working with WMI. The tool is still viable and you should have it in your arsenal.
Using PowerShell to Find Classes, Properties, and Methods.
Now that we know how to find WMI Classes with the GUI, let’s examine how to use PowerShell to accomplish the same.
A cool feature of PowerShell is the ability to search WMI Classes. With a couple of short commands we can find which WMI classes are available on local and remote machines.
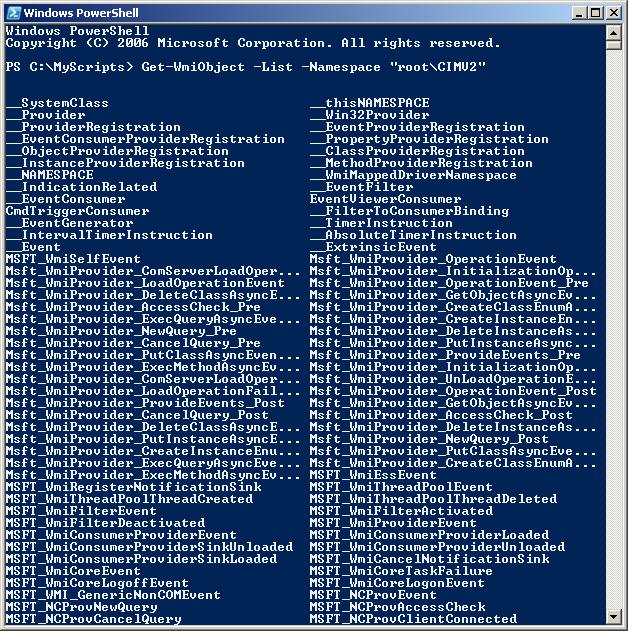
Example 1. List the available Classes on the local machine
Classes
image 11.2
Example 2. List the available Classes on a remote machine
Note: the “-Namespace” parameter is optional. Remember from looking at the WMI Control properties, the default namespace is root\cimv2. Sometimes the default namespace gets changed on a machine which is beyond our control. By adding the “-Namespace” parameter we insure connection to the desired namespace. Otherwise our scripts may fail to connect to the WMI Class required.
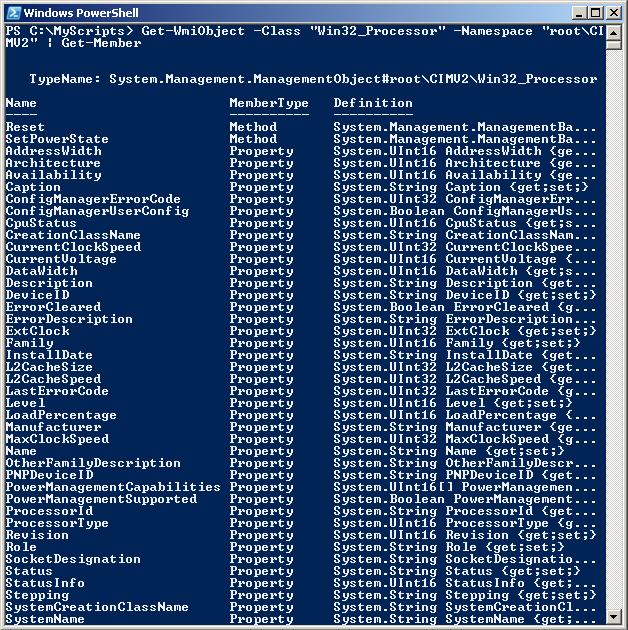
Example 3. List the Properties and Methods of a WMI Class.
From examples 1 and 2 we get a list of all the WMI classes within the namespace: root/cimv2. For now, we are interested in the “Win32″ classes. If you really want to get under the hood with what WMI is and does, follow this link for more information.
Sticking with the Theme of this training session, in the classes list you find the Win32_Processor class. Let’s get the properties and methods using the “Get-Member” cmdlet.
Properties and Methods
image 11.3
The importance of examples 1, 2, and 3, are to help you find classes to complete tasks. Something else I want you to take note of. Throughout these PowerShell Training Sessions we have talked about “data types.” Notice that both the GUI tool and PowerShell also include which data types we can expect when working with Properties.
In this short section we have discovered how to find WMI Classes that we require. In the following section we will learn how to connect to WMI and gather information. We are going to write a script that is going to create a Hardware inventory report.
Scripting with WMI
Scenario: The big boss has come to us requesting a hardware inventory report of all the servers on our network. What he wants to know:
- Machine manufacturer, model number, and serial number.
- BIOS information to determine if updates are required,
- OS type
- CPU information: Manufacturer, type, speed, and version.
- Amount of memory in each server.
- Disk information: Size, interface type, and media type.
- Network Information: IP settings and MAC address.
Our response: As always, no problem!
As you have seen from this tutorial, the amount of system information provided by WMI seems endless. But we have the tools to help us navigate the sea of system information. With the “Get-WmiObject” cmdlet we have access to all of this information. We only need to learn one syntax, which drastically cuts the learning curve.
Get-WmiObject syntax:
Get-WmiObject -Class [classname] -NameSpace [namespace] -ComputerName [ComputerName]
Using the syntax let’s see what result we get enumerating the BIOS settings. Since we are new to WMI and not sure which class to connect to, let’s use WMI CIM Tool and do a search on BIOS. Here are the results:
- CIM_BIOSElement
- CIM_BIOSFeature
- CIM_BIOSFeaturedBIOSElements
- CIM_BIOSLoadedlnNV
- CIM_VideoBIOSElemnt
- CIM_VideoBIOSFeatureVideoBIOSElements
- Win32_BIOS
- Win32_SMBIOSMemory
- Win32_SystemBIOS
Ok, so we have a lot to choose from. From expreince, I know the information I’m looking for is in the Win32_BIOS class. You will start to recognize which classes contain which information, just comes with time spent working with WMI. So using the syntax let’s look at our local systems BIOS information:
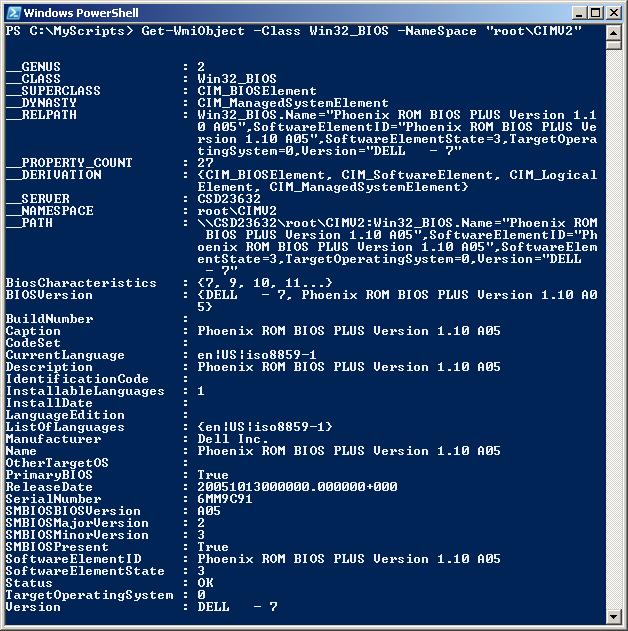
BIOS Information
image 11.4
Noticing the syntax I used for this example, I omitted the -computername parameter which by default enumerates the local system. The other parameters are optional as well, but take note of the different results that occur:
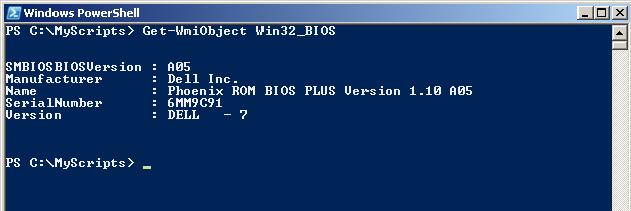
BIOS
image 11.5
In this example we omitted the -Class, -Namespace, and -ComputerName parameters. Note: we did not omit the actual class “Win32_BIOS” – we still need that. Ignoring the -Namespace parameter works because the local computer has the WMI name space default set to root\CIMV2, as mentioned earlier in this PowerShell training session. The output is also different, we are only presented with a small subset of properties that exist for the class. You will see this syntax example used on the Microsoft Scripts Repository examples as well as from other sources. The problem, if we are searching for available properties of a class this example doesn’t work for us. So, we can either use the full syntax or pipe this example to the Format-* cmdlet:
By using the wild card (*) in a regular expression, you should see a list of all the properties and their results.
Building our Inventory Script
I’m going to be using the Script and Function Templates that were introduced in the PowerShell Introduction to Scripting. You can copy the templates here if you haven’t already.
Step 1. Machine manufacturer, model number, and serial number
- Using the WMI CIM Tool search for system. From the list of available classes choose Win32_ComputerSystem. Let’s now use PowerShell to return all the property results:
Get-WmiObject Win32_ComputerSystem | Format-List *
- Identify which properties will provide the information for the requirement.
- Manufacturer = Manufacturer property.
- Model Number = Model property.
- Serial Number = No property exists in this class. We will have to find it somewhere else.
- Total Amount of Memory = TotalPhysicalMemory property exists in this class and does fulfill one of our requirements. So let’s use this property from this class.
- Build Code.
$strComputer =”.”
#Creates a variable called $colItems which contains the WMI Object
$colItems = Get-WmiObject Win32_ComputerSystem -Namespace “root\CIMV2″ `
-ComputerName $strComputer
#Use a foreach loop to iterate the $colItems (collection).
#Store the properties information in the $objItem Variable.
foreach($objItem in $colItems) {
#Use the Write-Host cmdlet to output required property information
Write-Host “Computer Manufacturer: ” $objItem.Manufacturer
Write-Host “Computer Model: ” $objItem.Model
Write-Host “Total Memory: ” $objItem.TotalPhysicalMemory “bytes”
}
Step 2. Get BIOS Information
Let’s build the next block of code for getting BIOS information.
- Search “BIOS” in WMI CIM Studio – Choose Win32_BIOS Class. Return property results:
Get-WmiObject Win32_BIOS | Format-List *
- Identify Properties:
- BIOS Type = Description property.
- Version = SMBIOSBIOSVersion, SMBIOSMajorVersion, SMBIOSMinorVersion properties.
- Serial Number requirement located = SerialNumber property.
- Build Code
$colItems = Get-WmiObject Win32_BIOS -Namespace “root\CIMV2″ -computername $strComputer
foreach($objItem in $colItems) {
Write-Host “BIOS:”$objItem.Description
Write-Host “Version:”$objItem.SMBIOSBIOSVersion”.”`
$objItem.SMBIOSMajorVersion”.”$objItem.SMBIOSMinorVersion
Write-Host “Serial Number:” $objItem.SerialNumber
}
Note: I’ve used the escape character (`) in each code block. In the first example after “root\CIMV2″` and in code above $objItem.SMBIOSBIOSVersion”.”`. The escape character lets the script engine know that this is a single line of code, even though we have a line break in the code. This is for aesthetics, keeping long lines of code readable. Warning: The escape character can also make troubleshooting difficult. I usually write my code in full to verify functionality, then add the escape character to clean things up.
Step 3. Write Code for the remaining requirements
To save space and keep you from being bored to tears, I’m going to write the rest of the script blocks for each of our Inventory requirements. By now I think you get the picture on how to find classes and can see which classes and properties I’ll be using in the code.
OS TYPE:
$colItems = Get-WmiObject Win32_OperatingSystem -Namespace “root\CIMV2″`
-Computername $strComputer
foreach($objItem in $colItems) {
Write-Host “Operating System:” $objItem.Name
}
CPU Info:
$colItems = Get-WmiObject Win32_Processor -Namespace “root\CIMV2″`
-Computername $strComputer
foreach($objItem in $colItems) {
Write-Host “Processor:” $objItem.DeviceID $objItem.Name
}
DISK Info:
$colItems = Get-WmiObject Win32_DiskDrive -Namespace “root\CIMV2″`
-ComputerName $strComputer
foreach($objItem in $colItems) {
Write-Host “Disk:” $objItem.DeviceID
Write-Host “Size:” $objItem.Size “bytes”
Write-Host “Drive Type:” $objItem.InterfaceType
Write-Host “Media Type: ” $objItem.MediaType
}
NETWORK Info:
$colItems = Get-WmiObject Win32_NetworkAdapterConfiguration -Namespace “root\CIMV2″`
-ComputerName $strComputer | where{$_.IPEnabled -eq “True”}
foreach($objItem in $colItems) {
Write-Host “DHCP Enabled:” $objItem.DHCPEnabled
Write-Host “IP Address:” $objItem.IPAddress
Write-Host “Subnet Mask:” $objItem.IPSubnet
Write-Host “Gateway:” $objItem.DefaultIPGateway
Write-Host “MAC Address:” $ojbItem.MACAddress
}
Building the User-Defined Functions
Now that we have the raw code, I’m going to convert it a user-defined function. Store the Function in your code library so that you can use it in other scripts.
SysInfo Function:
#* FUNCTION LISTING #*=============================================================================
#* Function: SysInfo
#* Created: [12/14/07]
#* Author: Auther Auther
#* Arguments:
#*=============================================================================
#* Purpose: WMI Function that enumerate win32_ComputerSystem properties
#*
#*
#*=============================================================================
Function SysInfo {
$colItems = Get-WmiObject Win32_ComputerSystem -Namespace “root\CIMV2″ `
-ComputerName $strComputer
foreach($objItem in $colItems) {
Write-Host “Computer Manufacturer: ” $objItem.Manufacturer
Write-Host “Computer Model: ” $objItem.Model
Write-Host “Total Memory: ” $objItem.TotalPhysicalMemory “bytes”
}
}
To test the function, copy and paste the code into powershell. Hit the Enter/Return key until you return to the command prompt. Call the function by typing the function name SysInfo in the command line.
BIOSInfo Function:
#* FUNCTION LISTING #*=============================================================================
#* Function: BIOSInfo
#* Created: [12/14/07]
#* Author: Auther Auther
#* Arguments:
#*=============================================================================
#* Purpose: WMI Function that enumerate win32_BIOS properties
#*
#*
#*=============================================================================
Function BIOSInfo {
$colItems = Get-WmiObject Win32_BIOS -Namespace “root\CIMV2″ -computername $strComputer
foreach($objItem in $colItems) {
Write-Host “BIOS:”$objItem.Description
Write-Host “Version:”$objItem.SMBIOSBIOSVersion”.”`
$objItem.SMBIOSMajorVersion”.”$objItem.SMBIOSMinorVersion
Write-Host “Serial Number:” $objItem.SerialNumber
}
}
OSInfo Function:
#* FUNCTION LISTING #*=============================================================================
#* Function: OSInfo
#* Created: [12/14/07]
#* Author: Auther Auther
#* Arguments:
#*=============================================================================
#* Purpose: WMI Function that enumerate win32_OperatingSystem properties
#*
#*
#*=============================================================================
Function OSInfo {
$colItems = Get-WmiObject Win32_OperatingSystem -Namespace “root\CIMV2″`
-Computername $strComputer
foreach($objItem in $colItems) {
Write-Host “Operating System:” $objItem.Name
}
}
CPUInfo Function:
#* FUNCTION LISTING #*=============================================================================
#* Function: CPUInfo
#* Created: [12/14/07]
#* Author: Auther Auther
#* Arguments:
#*=============================================================================
#* Purpose: WMI Function that enumerate win32_Processor properties
#*
#*
#*=============================================================================
Function CPUInfo {
$colItems = Get-WmiObject Win32_Processor -Namespace “root\CIMV2″`
-Computername $strComputer
foreach($objItem in $colItems) {
Write-Host “Processor:” $objItem.DeviceID $objItem.Name
}
}
DiskInfo Function:
#* FUNCTION LISTING #*=============================================================================
#* Function: DiskInfo
#* Created: [12/14/07]
#* Author: Auther Auther
#* Arguments:
#*=============================================================================
#* Purpose: WMI Function that enumerate win32_DiskDrive properties
#*
#*
#*=============================================================================
Function DiskInfo {
$colItems = Get-WmiObject Win32_DiskDrive -Namespace “root\CIMV2″`
-ComputerName $strComputer
foreach($objItem in $colItems) {
Write-Host “Disk:” $objItem.DeviceID
Write-Host “Size:” $objItem.Size “bytes”
Write-Host “Drive Type:” $objItem.InterfaceType
Write-Host “Media Type: ” $objItem.MediaType
}
}
NetworkInfo Function:
#* FUNCTION LISTING #*=============================================================================
#* Function: NetworkInfo
#* Created: [12/14/07]
#* Author: Auther Auther
#* Arguments:
#*=============================================================================
#* Purpose: WMI Function that enumerate win32_NetworkAdapterConfiguration properties
#*
#*
#*=============================================================================
Function NetworkInfo {
$colItems = Get-WmiObject Win32_NetworkAdapterConfiguration -Namespace “root\CIMV2″`
-ComputerName $strComputer | where{$_.IPEnabled -eq “True”}
foreach($objItem in $colItems) {
Write-Host “DHCP Enabled:” $objItem.DHCPEnabled
Write-Host “IP Address:” $objItem.IPAddress
Write-Host “Subnet Mask:” $objItem.IPSubnet
Write-Host “Gateway:” $objItem.DefaultIPGateway
Write-Host “MAC Address:” $ojbItem.MACAddress
}
}
Putting it all Together
So here is are long awaited script. Copy the script to a file called ServerInventory.ps1. Next, run the script.
#*=============================================================================
#* Script Name: [ServerInventory]
#* Created: [12/14/07]
#* Author: Auther Auther
#* Company: PowerShell Pro!
#* Email:
#* Web: http://www.powershellpro.com
#* Reqrmnts:
#* Keywords:
#*=============================================================================
#* Purpose: Server Hardware Inventory
#*
#*
#*=============================================================================
#*=============================================================================
#* REVISION HISTORY
#*=============================================================================
#* Date: [DATE_MDY]
#* Time: [TIME]
#* Issue:
#* Solution:
#*
#*=============================================================================
#*=============================================================================
#* FUNCTION LISTING
#*=============================================================================
#* Function: SysInfo
#* Created: [12/14/07]
#* Author: Auther Auther
#* Arguments:
#*=============================================================================
#* Purpose: WMI Function that enumerate win32_ComputerSystem properties
#*
#*
#*=============================================================================
Function SysInfo {
$colItems = Get-WmiObject Win32_ComputerSystem -Namespace “root\CIMV2″ `
-ComputerName $strComputer
foreach($objItem in $colItems) {
Write-Host “Computer Manufacturer: ” $objItem.Manufacturer
Write-Host “Computer Model: ” $objItem.Model
Write-Host “Total Memory: ” $objItem.TotalPhysicalMemory “bytes”
}
}
#*=============================================================================
#* FUNCTION LISTING
#*=============================================================================
#* Function: BIOSInfo
#* Created: [12/14/07]
#* Author: Auther Auther
#* Arguments:
#*=============================================================================
#* Purpose: WMI Function that enumerate win32_BIOS properties
#*
#*
#*=============================================================================
Function BIOSInfo {
$colItems = Get-WmiObject Win32_BIOS -Namespace “root\CIMV2″ -computername $strComputer
foreach($objItem in $colItems) {
Write-Host “BIOS:”$objItem.Description
Write-Host “Version:”$objItem.SMBIOSBIOSVersion”.”`
$objItem.SMBIOSMajorVersion”.”$objItem.SMBIOSMinorVersion
Write-Host “Serial Number:” $objItem.SerialNumber
}
}
#*=============================================================================
#* FUNCTION LISTING
#*=============================================================================
#* Function: OSInfo
#* Created: [12/14/07]
#* Author: Auther Auther
#* Arguments:
#*=============================================================================
#* Purpose: WMI Function that enumerate win32_OperatingSystem properties
#*
#*
#*=============================================================================
Function OSInfo {
$colItems = Get-WmiObject Win32_OperatingSystem -Namespace “root\CIMV2″`
-Computername $strComputer
foreach($objItem in $colItems) {
Write-Host “Operating System:” $objItem.Name
}
}
#*=============================================================================
#* FUNCTION LISTING
#*=============================================================================
#* Function: CPUInfo
#* Created: [12/14/07]
#* Author: Auther Auther
#* Arguments:
#*=============================================================================
#* Purpose: WMI Function that enumerate win32_Processor properties
#*
#*
#*=============================================================================
Function CPUInfo {
$colItems = Get-WmiObject Win32_Processor -Namespace “root\CIMV2″`
-Computername $strComputer
foreach($objItem in $colItems) {
Write-Host “Processor:” $objItem.DeviceID $objItem.Name
}
}
#*=============================================================================
#* FUNCTION LISTING
#*=============================================================================
#* Function: DiskInfo
#* Created: [12/14/07]
#* Author: Auther Auther
#* Arguments:
#*=============================================================================
#* Purpose: WMI Function that enumerate win32_DiskDrive properties
#*
#*
#*=============================================================================
Function DiskInfo {
$colItems = Get-WmiObject Win32_DiskDrive -Namespace “root\CIMV2″`
-ComputerName $strComputer
foreach($objItem in $colItems) {
Write-Host “Disk:” $objItem.DeviceID
Write-Host “Size:” $objItem.Size “bytes”
Write-Host “Drive Type:” $objItem.InterfaceType
Write-Host “Media Type: ” $objItem.MediaType
}
}
#*=============================================================================
#* FUNCTION LISTING
#*=============================================================================
#* Function: NetworkInfo
#* Created: [12/14/07]
#* Author: Auther Auther
#* Arguments:
#*=============================================================================
#* Purpose: WMI Function that enumerate win32_NetworkAdapterConfiguration
#* properties
#*
#*=============================================================================
Function NetworkInfo {
$colItems = Get-WmiObject Win32_NetworkAdapterConfiguration -Namespace “root\CIMV2″`
-ComputerName $strComputer | where{$_.IPEnabled -eq “True”}
foreach($objItem in $colItems) {
Write-Host “DHCP Enabled:” $objItem.DHCPEnabled
Write-Host “IP Address:” $objItem.IPAddress
Write-Host “Subnet Mask:” $objItem.IPSubnet
Write-Host “Gateway:” $objItem.DefaultIPGateway
Write-Host “MAC Address:” $ojbItem.MACAddress
}
}
#*=============================================================================
#* SCRIPT BODY
#*=============================================================================
#* Connect to computer
$strComputer = “.”
#* Call SysInfo Function
Write-Host “Sytem Information”
SysInfo
Write-Host
#* Call BIOSinfo Function
Write-Host “System BIOS Information”
BIOSInfo
Write-Host
#* Call OSInfo Function
Write-Host “Operating System Information”
OSInfo
Write-Host
#* Call CPUInfo Function
Write-Host “Processor Information”
CPUInfo
Write-Host
#* Call DiskInfo Function
Write-Host “Disk Information”
DiskInfo
Write-Host
#* Call NetworkInfo Function
Write-Host “Network Information”
NetworkInfo
Write-Host
#*=============================================================================
#* END OF SCRIPT: [ServerInventory]
#*=============================================================================
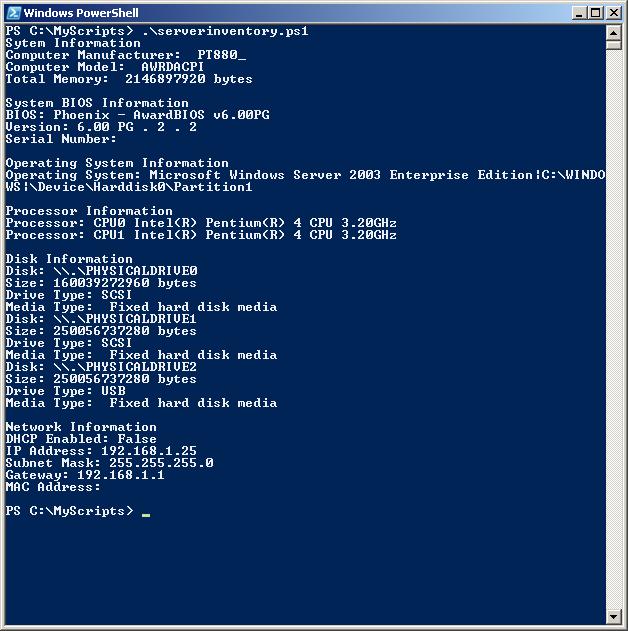
Script Results
Running the script I receive the following data:
image 11.6
Looks like the script is working and were getting back the information required. But this script only works on the local machine. We can now start tweaking the “SCRIPT BODY” portion of the script to attach to remote machines.
Tweak 1. Connecting to a remote computer
This tweak is easy, we only need to change one line of code:
In the script body make the following change.
#* Connect to computer
$strComputer = “.”
-to-
#* Connect to computer
$strComputer = “ComputerName”
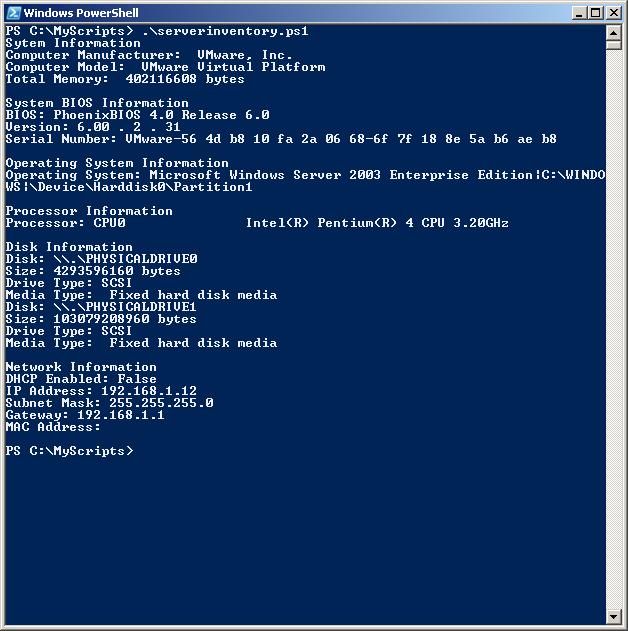
Remote Computer Results
image 11.7
Image 11.7 is a list of properties from my remote file and print server. I want to change the script to prompt me to enter a computer name so that I don’t have to manually change within the code. I also want to display the computer name so I know where the information is coming from.
Tweak 2. Script to prompt user for computer name
Again, change the $strComputer=”.” code to:
$strComputer = Read-Host “Enter Computer Name”
Write-Host “Computer:” $strComputer
By adding the two lines above, the script will prompt for and display the computer name used by the script. Make your edit in the “SCRIPT BODY” and then execute it.

Read-Host
image 11.8
When executing the script you are prompted to enter the name of the computer you wish to inventory. Type a computer name and press the Enter/Return key.
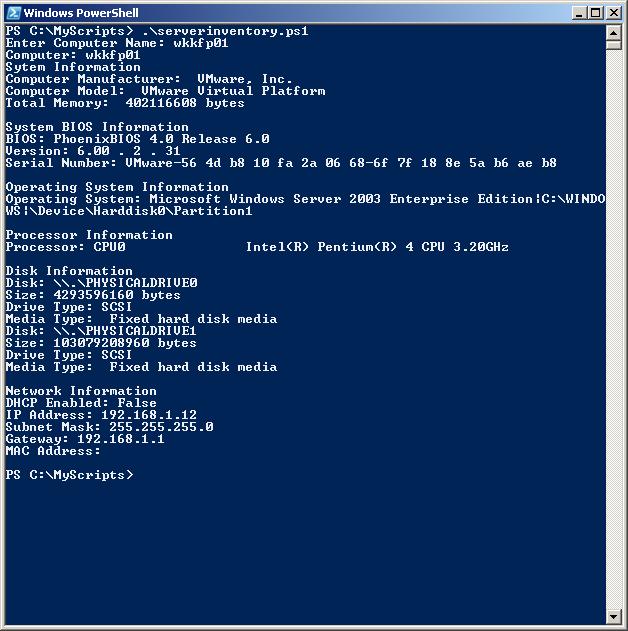
Results
image 11.9
Now you can start having some fun running your script against other remote computers on your network (local admin rights required). The boss is happy with what he sees and wants you to gather the same information from all the computers on your network. Your answer: “No Problem…”
Since it would not be practical to run the script one time for each computer on the network, we are going to change the code in the “SCRIPT BODY” to use an array. To demonstrate this I will be using the “Get-Content” cmdlet to read a text file that contains all the computer names I want to enumerate. The “Get-Content” cmdlet reads the file and creates the array for me.
Tweak 3. Use an array to gather information from multiple computers
Step 1. Create a text file C:\MyScripts\Computers.txt and import or enter each computer name on a separate line. For Example:
Computer01
Computer02
Computer03
Etc...
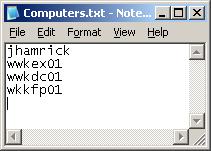
Computer Names
For this demonstration this is what my text file looks like:
image 11.10
When you do this in the real world, it is not uncommon to have hundreds or thousands of entries in you text file.
Step 2. Change to “SCRIPT BODY” code to use the “Get-Content” cmdlet.
Change $strComputer = “.”
-to-
$arrComputers = get-Content -Path “C:\MyScripts\Computers.txt”
foreach ($strComputer in $arrComputers){Function Calls go here}
At this point I am also going to use a couple more tweaks to organize the output on the screen. I will add Write-Host $strComputer at the beginning of the “SCRIPT BODY” and use Write-Host “End of report for $strComputer” at the end.
Here is what the new “SCRIPT BODY” should look like:
#* SCRIPT BODY
#*=============================================================================
#* Create and array from C:\MyScripts\Computers.txt
$arrComputers = get-Content -Path “C:\MyScripts\Computers.txt”
foreach ($strComputer in $arrComputers){ #Function Calls go here
Write-Host “Computer Name:” $strComputer
Write-Host “======================================”
#* Call SysInfo Function
Write-Host “Sytem Information”
SysInfo
Write-Host
#* Call BIOSinfo Function
Write-Host “System BIOS Information”
BIOSInfo
Write-Host
#* Call OSInfo Function
Write-Host “Operating System Information”
OSInfo
Write-Host
#* Call CPUInfo Function
Write-Host “Processor Information”
CPUInfo
Write-Host
#* Call DiskInfo Function
Write-Host “Disk Information”
DiskInfo
Write-Host
#* Call NetworkInfo Function
Write-Host “Network Information”
NetworkInfo
Write-Host “End of Report for $strComputer”
Write-Host “======================================”
Write-Host
Write-Host
} #End function calls.
Since I like the script that prompts for a computer name, I’m going to create a new script file called PCReport.ps1 by using Save as in the file menu. Now that we know the ServerInventory.ps1 script is safe we can edit the “SCRIPT BODY” in PCReport.ps1. The file names are just for demonstration, choose any file name you wish.
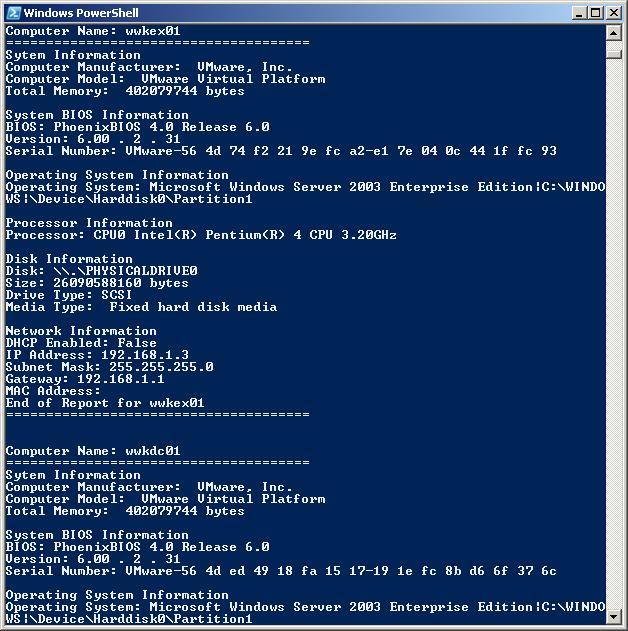
Script Results
After you have completed editing the “SCRIPT BODY” run the script.
image 11.11
You output should be similar to that of image 11.11
This concludes Part 1. of the WMI Tutorial. In part 2. we will be making changes to WMI Objects using methods. For example: You have added a DHCP server to manage all of your IP subnets. I will show you how to use methods to change all of your workstations from static to dynamic DHCP clients, no need to physically visit each workstation. And in Part 3. we will discuss how to create reports.
Section 2: Scripting with Windows Management Instrumentation (WMI) - Methods
Part 1 introduced us to WMI. We learned how to ‘find' classes and examine their properties and methods. Hope you downloaded and familiarized yourself with WMI CIM Studio, as it is a great tool to have. We also learned how to find WMI Classes when working in PowerShell. Tutorial 11 Part 1 was about gathering data by enumerating properties within a WMI Class. In Part 2 of the PowerShell Tutorial for WMI, we are going to be using Methods to make changes in our environment. The example scripts make changes to the environment, I highly recommend running any script in a test environment before applying them in your production environment.
Working with Methods
Example 1.
Here's where the fun begins... The Big Boss has come to your office after you have successfully implemented DHCP on your network. You figure he's there to give you a "big" pat on the back and an even "bigger" raise (wishful thinking). The reality is, the desktop group is complaining because they don't want to re-configure each workstation from static IP to DHCP. It's not that they have an underlying hatred for DHCP, they just don't want to physically visit all 4000 workstations to make the change - I don't blame them... You look the Boss right in the eye and give him your standard answer, "NO PROBLEM" - I'll take care of it. After all you are becoming a PowerShell GURU and you are no stranger to managing complex environments.
1. First step, what WMI Class are we going to use to accomplish this task?
Using WMI CIM Studio, I did a search for "Network." I found the Class
"Win32_NetworkAdapterConfiguration" which has a method called "EnableDHCP"
- Looks like a winner to me. Another important thing to note, this Class
also has a property called "IPEnabled" which provides a boolean data type
(True or False). The importance of this property will be apparent as we
build the script.
2. I'm going test the script on my local workstation, so I verify that my
NIC is setup as static:
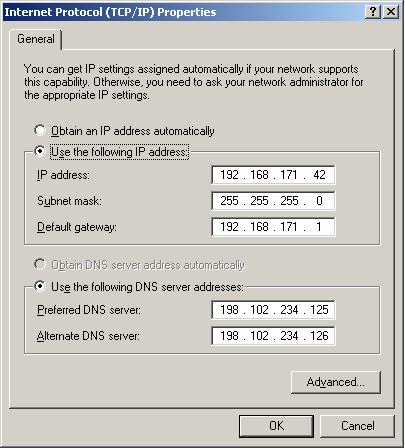
DHCP Properties
3. Here is the script code that will change the NIC settings to "Obtain an IP address automatically"
$NICs = Get-WmiObject Win32_NetworkAdapterConfiguration `
| Where {$_.IPEnabled -eq "TRUE"}
foreach($NIC in $NICs) {$NIC.EnableDHCP()}
So what is the script doing?
· The first line stores the results of our WMI query in a variable called $NICs.
· It also utilizes the Property "IPEnabled" to filter active IP configured Network Adapters. This enables us to skip any disconnected, virtual, and/or non-IP configured NICs; such as NetBUI, IPX/SPX, AppleTalk, etc...
· We then use a foreach loop to iterate each item in the collection and use the "EnableDCHP" method to configure the NIC as a DHCP client.
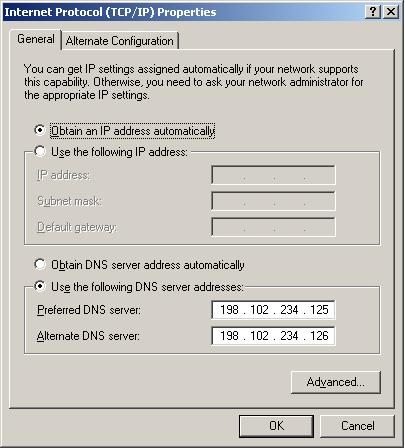
IP Set To DHCP
You should see the following result:
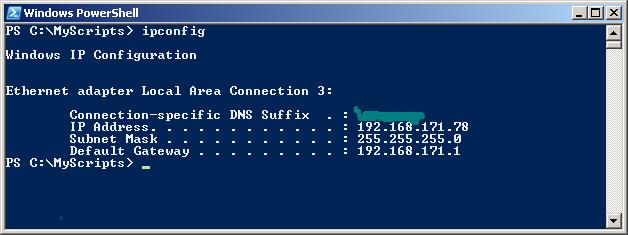
ipconfig Results
4. Let's verify we've received and IP address from DHCP. If you don't have a DHCP server assigning addresses on your network, just follow the steps as we go. My address has changed from 192.168.171.42 (my static IP range) to 192.168.171.78 which is in my DHCP address pool, cool success! Okay... so we're half way there with our code.
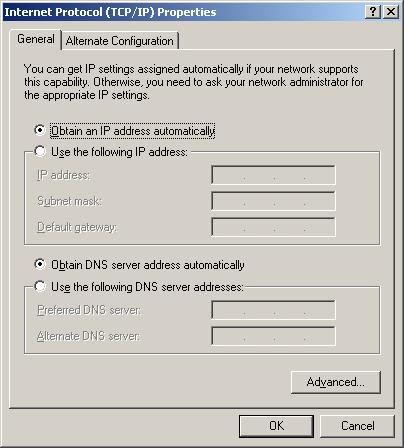
DNS Changed to DHCP
5. The next step is to change the DNS setting to "Obtain DNS server address automatically." We want to change this so that we can utilize the DNS Scope Options created on the DHCP server. This was not a simple feat in VBScript, as we could not pass a "NULL" or and Empty String as we did with EnableDHCP(). Using PowerShell we are able to pass a "NULL" to the SetDNSServerSearchOrder method which sets the DHCP option. We are only adding one line to our script code $NIC.SetDNSServerSearchOrder()
$NICs = Get-WMIObject Win32_NetworkAdapterConfiguration `
| where{$_.IPEnabled -eq "TRUE"}
Foreach($NIC in $NICs) {
$NIC.EnableDHCP()
$NIC.SetDNSServerSearchOrder()
}
Running the code should yield the following results:
Do an "ipconfig /all" to verify the DNS server settings as well as other scope options are available. You should also see DHCP Lease Obtain and Expires infomation.
Example 2.
I'm not going to leave you hanging, let's say we want to use methods of the "Win32_NetworkAdapterConfiguration" Class to change to static IP or you wish to make changes in a static IP environment.
Let's examine all the methods available to us:
Get-WmiObject Win32_NetworkAdapterConfiguration `
| Get-Member -MemberType Methods | Format-List
Here is a list of the Methods that are available to this Class:
- DisableIPSec
- EnableDHCP
- EnableIPSec
- EnableStatic
- ReleaseDHCPLease
- RenewDHCPLease
- SetDNSDomain
- SetDNSServerSearchOrder
- SetDynamicDNSRegistration
- SetGateways
- SetIPConnectionMetric
- SetIPXFrameTypeNetworkPairs
- SetTcpipNetbios
- SetWINSServer
- ConvertFromDateTime
- ConvertToDateTime
- Delete
- GetType
- Put
Looking at the list, there are a number of methods we can use to remotely configure machines. Granted, the workstation is available on the network.
I'm going to share a script that is going to set the IP address, subnet mask, gateway, DNS, and WINS servers. But before I do a special note: Data Types, I bring it up again because knowing which "Data Type" is expected will help when using Methods. For example, let's look at the Definitions for SetDynamicDNSRegistration and SetWINSServer Methods.
Name : SetDynamicDNSRegistration
Definition : System.Management...(
System.Boolean
FullDNSRegistrationEnabled...)
Right away you should notice that the Method uses a boolean argument (TRUE or FALSE). If you look at this setting graphically (Network Adapter properties - TCP/IP settings - Advanced Settings - DNS tab - Check box near the bottom) you will see that this setting is a check box. When checked the boolean value = TRUE, unchecked = FALSE.
In the real-world: A call comes in stating that a workstation was moved to another network subnet, when pinging its FQDN or doing a reverse DNS lookup it yields the old IP address. User can't use application because network application requires name resolution (it can happen). You enumerate the "FullDNSRegistrationEnabled" property and it comes back with a setting of "FALSE." Quickly you run the "FullDNSRegistrationEnabled("TRUE")" Method to resolve the issue. You're a star!!!
Name :SetWINSServer
Definition: System.Management..(
System.String
WinsPrimaryServer, ...)
Take note that this Method requires a text string data type. By now I'm sure we all know what a text string is.
Here is the script code:
$NICs = Get-WMIObject Win32_NetworkAdapterConfiguration `
| where{$_.IPEnabled -eq "TRUE"}
Foreach($NIC in $NICs) {
$NIC.EnableStatic("192.168.171.42″, "255.255.255.0″)
$NIC.SetGateways("192.168.171.1″)
$DNSServers = "198.102.234.125″,"198.102.234.126″
$NIC.SetDNSServerSearchOrder($DNSServers)
$NIC.SetDynamicDNSRegistration("TRUE")
$NIC.SetWINSServer("198.102.234.125″, "198.102.234.126″)
}
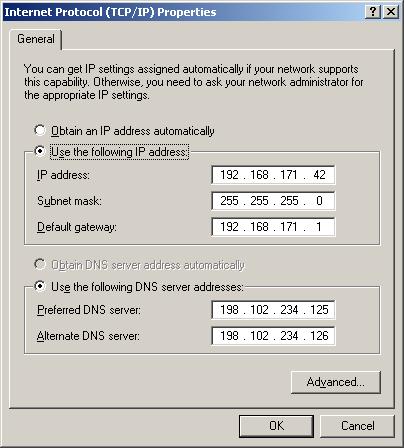
Setting Static IP
Results:
IP Address, Subnet Mask, Default Gateway, DNS Servers configured
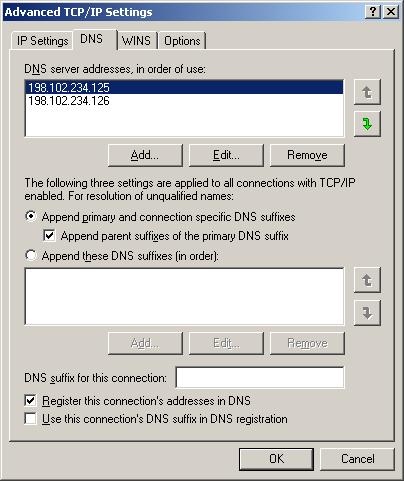
Register Check Box Enabled
Register this connection's addresses in DNS enabled.
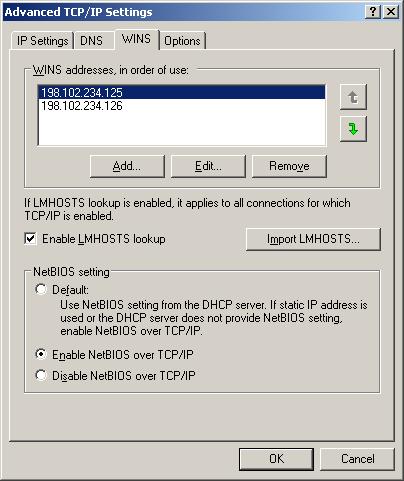
WINS Configuration
WINS Configured.
Let's take a closer look at the code:
$NICs = Get-WMIObject Win32_NetworkAdapterConfiguration `
| where{$_.IPEnabled -eq "TRUE"}
The first line of code creates a variable called $NICs and holds all the properties and methods for the "Win32_NetworkAdapterConfiguration" Class "where" the Network Adapter is IP Enabled. The "where" filter allows us to choose only real network adapters apposed to virtual and/or non-IP based NICs.
Foreach($NIC in $NICs) {
}
We now use a "Foreach" loop to iterate the $NICs collection.
$NIC.EnableStatic("192.168.171.42″, "255.255.255.0″)
$NIC.SetGateways("192.168.171.1″)
$DNSServers = "198.102.234.125″,"198.102.234.126″
$NIC.SetDNSServerSearchOrder($DNSServers)
$NIC.SetDynamicDNSRegistration("TRUE")
$NIC.SetWINSServer("198.102.234.125″, "198.102.234.126″)
Within the foreach loop, we take an instance and use methods to assign values. Looking above we used the Method EnableStatic() to assign an IP address and subnet mask. Note: the IP address are integers but they have been encased in quotes as the Method requires a text string value. Also, each entry is separated by a comma.
$DNSServers = "198.102.234.125″,"198.102.234.126″
$NIC.SetDNSServerSearchOrder($DNSServers)
These two lines of code are interesting, as I ran into trouble with the
"SetDNSServerSearchOrder" method. I attempted to use the following but it
would only allow me to set the preferred DNS server -
SetDNSServerSearchOrder("198.102.234.125″, "198.102.234.126″)
I thought it would work the same as setting the WINS servers, but look at
the differences in each method's definition:
SetWINSServer
(System.String WINSPrimaryServer, System.String WINSSecondaryServer)
SetDNSServerSearchOrder
(System.String[] DNSServerSearchOrder)
Looking up the "SetDNSServerSearchOrder" method on the Microsoft Developer
site it states:
The
SetDNSServerSearchOrder
WMI class method uses an array of string elements to set the server
search order.
Okay... an array of string elements. We've worked with arrays, we know how to build them. Look at the code again:
$DNSServers = "198.102.234.125″,"198.102.234.126″
$NIC.SetDNSServerSearchOrder($DNSServers)
The first line creates an array and assigns values to the variable
$DNSServers.
The second line uses the SetDNSServer... method and uses the values in
$DNSServer.
Fun stuff right?!?
This is a good example of understanding which DataTypes are expected. Since
I was puzzled by the definition, I looked up the Method on Microsoft
Developers site and found the answer - phew!!!
Example 3.
In this example I'm going to show you how to format your hard drive... just kidding! But, if that were a task for you to complete, you should feel comfortable at this point with locating the WMI Class required and the Methods to do the job.
We are going to have a little fun, in this example were are going to use the "Win32_OperatingSystem" class to re-boot computers.
1. Verify which Methods are available:
Get-WmiObject Win32_OperatingSystem | Get-Member -MemberType Method | Format-List
2. Available Methods:
o Reboot
o SetDateTime
o Shutdown
o Win32Shutdown
Not much to it, we'll use the "Reboot" Method to re-boot the computer. Don't do it now, I'm just showing the code at this time.
3. Local Re-boot code:
$colItems = Get-WmiObject Win32_OperatingSystem
Foreach($Item in $colItems){
$Item.Reboot()
}
If you are a local Admin and you get the following error: "Privilege not held" there is a bug in .NET 1.0 SP3 .
4. The evil remote reboot. I just have to state this disclaimer: "Use this script only to resolve issues, do not use it to flame your fellow coworkers." With that said, here is code to connected to a remote PCServer and reboot it. Save and run the code as RemBoot.ps1. The Code Prompts for the computer name you wish to reboot:
$strComputer = Read-Host "Enter Computer Name"
$colItems = Get-WmiObject Win32_OperatingSystem -ComputerName
"$strComputer"
Foreach($Item in $colItems) {
$Item.Reboot()
}
Okay... we could go on for days with examples on how to use Methods of a WMI Class. My goal of the WMI tutorials are to show you how to find Classes and discover which Properties and Methods are available. This is enough to get you up and working with WMI. There is also a really cool "FREE" tool for scripting with WMI (WMI Explorer) that comes from "ThePowerShellGuy" website
Section 3: Scripting with Windows Management Instrumentation (WMI) - Creating Reports
In this, the last installment of the WMI tutorials we tackle creating reports. Up until this point we have only been concern with outputting our results to the console. Being that we are in the real world and we work for bosses that like little "picture thingys" and reports, we need to send results to files. There is one small problem... the WMI Scripts on this site (so far) and the scripts in the Microsoft Script Repository only output results to the screen (Write-Host). When using "Write-Host, output is sent to the console and that's it, the data no longer exists, there is nothing to redirect (>) or pipe (|) to another cmdlet or file. Nothing is wrong with the "Write-Host" cmdlet, it's functioning as it was designed (send output to the screen). To provide you with an example of why "Write-Host" is not a good choice for report writing do the following example:
We will use an edited version of the List BIOS Information script found in
the Microsoft Scripting Repository.
Here is the code:
$strComputer = "."
$colItems = get-wmiobject -class "Win32_BIOS" -namespace "rootCIMV2″ `
-computername $strComputer
foreach ($objItem in $colItems) {
write-host "Name: " $objItem.Name
write-host "Description: " $objItem.Description
write-host "Status: " $objItem.Status
write-host "Version: " $objItem.Version
}
Save the code as BIOS.ps1 and let's attempt to redirect the output to a file called BIOS.txt.
.BIOS.ps1 | Out-File -FilePath "C:MyScriptsBIOS.txt"
-or-
.BIOS.ps1 > "C:MyScriptsBIOS.txt"
In both examples; the script runs, outputs results to the screen, creates a text document called BIOS.txt, but no information is redirected (or piped) to the file. The reason this happens it the information has been outputted to the screen, using Write-Host, prior to piping the information. In essence there is nothing to redirect...
Writing to a text file
The MS scripts are fine if you are running the script against one or two machines and console output is all you need. In the real world you will want to save the information for processing at a later time and/or you will be gathering more data than the console buffer will be able to show (you could always increase the buffer but why?).
To output the BIOS.ps1 script to a file, we are required to modify the code. Most example I have seen look similar to the following:
$strComputer = "."
$colItems = get-wmiobject -class "Win32_BIOS" -namespace "rootCIMV2″ `
-computername $strComputer
foreach ($objItem in $colItems) {
Write-Output "BIOS Version: " $objItem.BIOSVersion | Out-File -filepath
"C:MyScriptsBIOS.txt" -append
write-Output "Description: " $objItem.Description | Out-File -filepath
"C:MyScriptsBIOS.txt" -append
write-Output "Status: " $objItem.Status | Out-File -filepath
"C:MyScriptsBIOS.txt" -append
write-Output "Version: " $objItem.Version | Out-File -filepath
"C:MyScriptsBIOS.txt" -append
}
Changes:
- Replaced "Write-Host" with "Write-Output" cmdlet.
· Piped the result of the "Write-Output" cmdlet to the "Out-File" cmdlet and supplied the proper parameters.
When running the script, no information is output to the console, but information is available in the BIOS.txt file. For my taste this is not exactly what I want, even though we are successfully writing output to a file. I want to be able to choose whether to output to the console or pipe to a file. And I only want to use one script to accomplish both tasks.
Here is my example of how to modify the MS Script to fulfill my requirement. Again, here is the original code:
$strComputer = "."
$colItems = get-wmiobject -class "Win32_BIOS" -namespace "rootCIMV2″ `
-computername $strComputer
foreach ($objItem in $colItems) {
write-host "BIOS Version: " $objItem.BIOSVersion
write-host "Description: " $objItem.Description
write-host "Status: " $objItem.Status
write-host "Version: " $objItem.Version
}
Here is how I modify Microsoft's' code. Change the code in BIOS.ps1 to:
$strComputer = "."
$colItems = get-wmiobject -class "Win32_BIOS" -namespace "rootCIMV2″ `
-computername $strComputer
foreach ($objItem in $colItems) {
"BIOS Version: " + $objItem.BIOSVersion
"Description: " + $objItem.Description
"Status: " + $objItem.Status
"Version: " + $objItem.Version
" "
}
Changes:
· I remove the "Write-Host" and "Write-Output" cmdlets all together.
· Then I concatenate the text sting and the object variable using the (+) operator.
· I added a NULL string(" ") to add a blank line(separator) at the end of the output.
Now I have a script that will accommodate my requirements.
1. I can run the script and the results are printed to the console:
.BIOS.ps1
2. I can run the script and send the output to a text file:
.BIOS.ps1 > "C:MyScriptsBios.txt"
Outputs to a text filed called Bios.txt
.BIOS.ps1 >> "C:MyScriptsBios.txt"
Appends data to the file Bios.txt
.BIOS.ps1 | Out-File -Filepath "C:MyScriptsBios.txt"
Outputs to the text file.
.BIOS.ps1 | Out-File -Filepath "C:MyScriptsBios.txt" -append
Appends data to the file.
Converting Microsoft PowerShell Scripts
Let's demonstrate, by using the "find" and "replace" functions built into notepad, how to convert the Microsoft Scripts (or any other PowerShell Script you may have) to this format.
Here is to code we are going to work with, yep another Microsoft Script:
$strComputer = "."
$colItems = get-wmiobject -class "Win32_NetworkAdapter" -namespace
"rootCIMV2″ `
-computername $strComputer
foreach ($objItem in $colItems) {
write-host "Adapter Type: " $objItem.AdapterType
write-host "Adapter Type ID: " $objItem.AdapterTypeId
write-host "Autosense: " $objItem.AutoSense
write-host "Availability: " $objItem.Availability
write-host "Caption: " $objItem.Caption
write-host "Configuration Manager Error Code: "
$objItem.ConfigManagerErrorCode
write-host "Configuration Manager User Configuration: "
$objItem.ConfigManagerUserConfig
write-host "Creation Class Name: " $objItem.CreationClassName
write-host "Description: " $objItem.Description
write-host "Device ID: " $objItem.DeviceID
write-host "Error Cleared: " $objItem.ErrorCleared
write-host "Error Description: " $objItem.ErrorDescription
write-host "Index: " $objItem.Index
write-host "Installation Date: " $objItem.InstallDate
write-host "Installed: " $objItem.Installed
write-host "Last Error Code: " $objItem.LastErrorCode
write-host "MAC Address: " $objItem.MACAddress
write-host "Manufacturer: " $objItem.Manufacturer
write-host "Maximum Number Controlled: " $objItem.MaxNumberControlled
write-host "Maximum Speed: " $objItem.MaxSpeed
write-host "Name: " $objItem.Name
write-host "Network Connection ID: " $objItem.NetConnectionID
write-host "Network Connection Status: " $objItem.NetConnectionStatus
write-host "NetworkAddresses: " $objItem.NetworkAddresses
write-host "Permanent Address: " $objItem.PermanentAddress
write-host "PNP Device ID: " $objItem.PNPDeviceID
write-host "Power Management Capabilities: "
$objItem.PowerManagementCapabilities
write-host "Power Management Supported: " $objItem.PowerManagementSupported
write-host "Product Name: " $objItem.ProductName
write-host "Service Name: " $objItem.ServiceName
write-host "Speed: " $objItem.Speed
write-host "Status: " $objItem.Status
write-host "Status Information: " $objItem.StatusInfo
write-host "System Creation Class Name: " $objItem.SystemCreationClassName
write-host "System Name: " $objItem.SystemName
write-host "Time Of Last Reset: " $objItem.TimeOfLastReset
write-host
}
1. Save the script as NetAdp.ps1
2. Open the script in Notepad (if not already open).
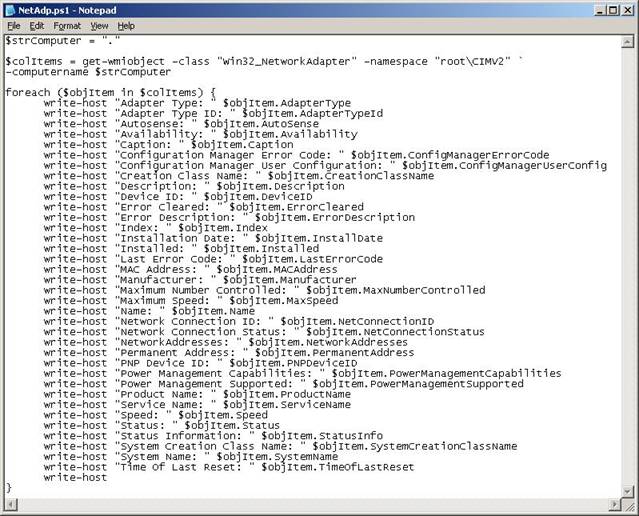
Script in Notepad
3. Go to the Edit menu and choose "Replace..." -or- Ctrl+H
4. Let's remove the Write-Host cmdlet from the script. In the "Find What:" text box enter - Write-Host. In the "Replace with" text box enter - nothing (nada, nill, null). Should look like this:
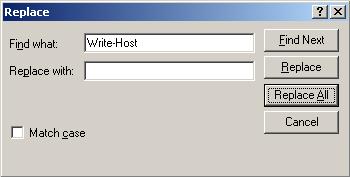
Replace Dialog Box
5. Click the "Replace All" button. All instances of "write-host" should now be removed. The Script should resemble this:
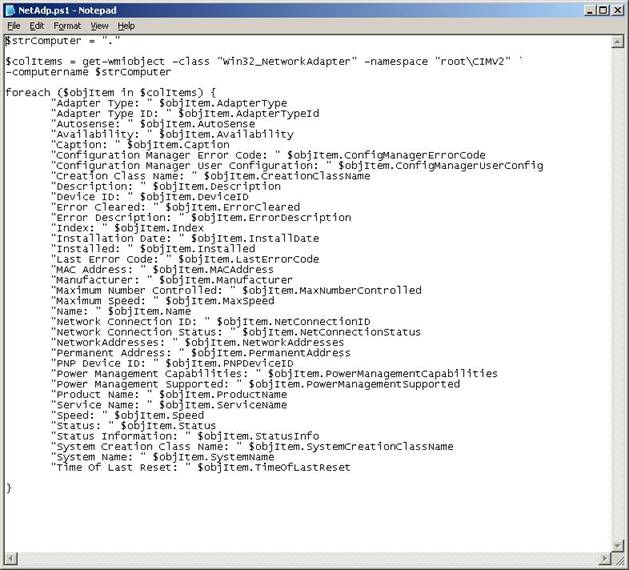
Write-Host Removed
6. Next, we concatenate the strings and variables. At first glance it looked like we could find ($) and replace with ( + $) but, this wont work as it would find "$strComputer" and replace is with "+ $strComputer" which would blow up the script. We would also screw up $objItem and $colItems variables, rendering the script inoperable. On closer inspection you should see a pattern that is only used in the script block and would not affect $strComputer. That pattern is (" $). So, in "Find what:" we search for " $ and in "Replace with:" we use " + $ in the text box (don't forget the spaces). FYI - in (" + $|) the (|) is my cursor not a pipe:
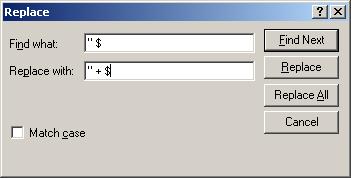
Find and Replace
7. Click "Replace All" button to concatenate the lines. Congrats your script looks as follows and is now ready to output data to either the console or a file.
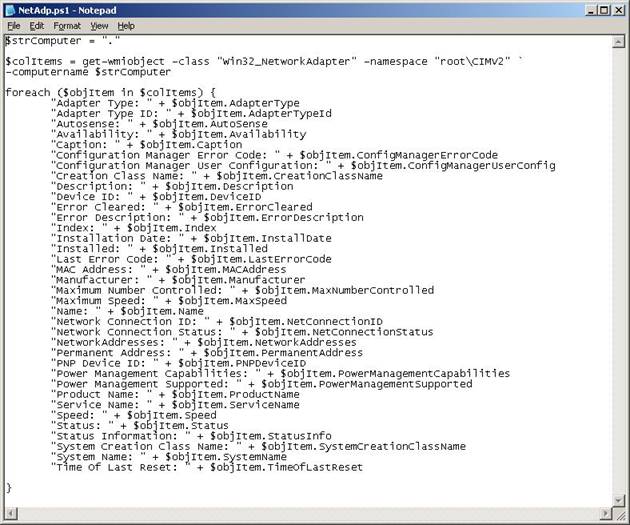
Edited Script
8. Let's verify that we have provided a solution for our requirement.
Run Script and send output to the console:
.NetAdp.ps1
Results sent to the console, excellent!
Run Script and send output to a file called
C:MyScriptsNetworkAdapterInfo.txt
.NetAdp.ps1 > "C:MyScriptsNetworkAdapterInfo.txt"
File was created and results captured.
This issue has been previously written about in " A Problem with the Microsoft Script Repository " article posted previously on this site. Don Jones from Sapien Technologies was kind enough to chime in and explain the issue further.
"Some background: Write-Host sends objects directly to Out-Host, which displays them on the screen. There's no chance for redirection to step in.
Write-Output, on the other hand, writes objects to the pipeline. Normally, the pipeline ends in Out-Default - which redirects objects to Out-Host and thus displays them on-screen. However, if you do something like
Dir | Out-File c:dir.txt
The objects go from the pipeline into a file. Because most of the Out-* cmdlets don't emit objects, the pipeline after Out-File is empty, so nothing is displayed on-screen.
There IS a lot of misunderstanding about the difference between Write-Host and Write-Output. A simple example is:
Write-Output (1,2,3) | Where { $_ -gt 1 }
Write-Host (1,2,3) | Where { $_ -gt 1 }
In the first, three objects are dumped into the pipeline. Where-Object filters out the first, leaving two to go on to Out-Default and then Out-Host. So you see 2 and 3. In the second example, three objects are written to Out-Host. There's nothing in the pipeline, so Where-Object has nothing to filter. Nothing goes to Out-Default. So you see 1, 2, and 3 - because they bypassed the pipeline and went directly to the screen.
About the only way to "redirect" Write-Host is to use Start-Transcript and Stop-Transcript, since they explicitly grab everything that appears on-screen, no matter how it gets there."
-Don Jones
I want to thank Don for taking the time in assisting the PowerShellPro readers in clearing up a common misunderstanding of the use of the "Write-Host" cmdlet.
Output results to an Excel spreadsheet
We have not discussed using com objects with powershell... yet! I'll be launching a tutorial that covers this subject more in-depth, for now I am going to show an example that uses a com object (Excel) to create a report. The script we will be using gathers Logical Disk Information and outputs the results to an Excel file:
$strComputer = "."
$Excel = New-Object -Com Excel.Application
$Excel.visible = $True
$Excel = $Excel.Workbooks.Add()
$Sheet = $Excel.WorkSheets.Item(1)
$Sheet.Cells.Item(1,1) = "Computer"
$Sheet.Cells.Item(1,2) = "Drive Letter"
$Sheet.Cells.Item(1,3) = "Description"
$Sheet.Cells.Item(1,4) = "FileSystem"
$Sheet.Cells.Item(1,5) = "Size in GB"
$Sheet.Cells.Item(1,6) = "Free Space in GB"
$WorkBook = $Sheet.UsedRange
$WorkBook.Interior.ColorIndex = 8
$WorkBook.Font.ColorIndex = 11
$WorkBook.Font.Bold = $True
$intRow = 2
$colItems = Get-wmiObject -class "Win32_LogicalDisk" -namespace
"root\CIMV2″ `
-computername $strComputer
foreach ($objItem in $colItems) {
$Sheet.Cells.Item($intRow,1) = $objItem.SystemName
$Sheet.Cells.Item($intRow,2) = $objItem.DeviceID
$Sheet.Cells.Item($intRow,3) = $objItem.Description
$Sheet.Cells.Item($intRow,4) = $objItem.FileSystem
$Sheet.Cells.Item($intRow,5) = $objItem.Size / 1GB
$Sheet.Cells.Item($intRow,6) = $objItem.FreeSpace / 1GB
$intRow = $intRow + 1
}
$WorkBook.EntireColumn.AutoFit()
Clear
Copy the script code and save it as "LogDiskRpt.ps1″
Run the script:
.LogDiskRpt.ps1
Executing this PowerShell Script launches Excel and outputs the results to
the predetermined cells.
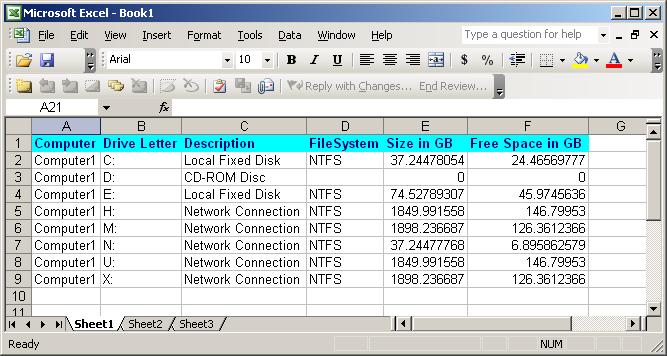
Cool stuff! Let's break down what the script does:
$Excel = New-Object -Com Excel.Application
$Excel.visible = $True
$Excel = $Excel.Workbooks.Add()
This first block of code Uses the "New-Object" cmdlet and the "-com" parameter to launch Excel and place the object in the $Excel variable. Next it sets the visible property to True enabling the end user to see the Excel process, meaning it is visible on our monitor. The last line of code opens a new workbook.
$Sheet = $Excel.WorkSheets.Item(1)
$Sheet.Cells.Item(1,1) = "Computer"
$Sheet.Cells.Item(1,2) = "Drive Letter"
$Sheet.Cells.Item(1,3) = "Description"
$Sheet.Cells.Item(1,4) = "FileSystem"
$Sheet.Cells.Item(1,5) = "Size in GB"
$Sheet.Cells.Item(1,6) = "Free Space in GB"
$WorkBook = $Sheet.UsedRange
$WorkBook.Interior.ColorIndex = 8
$WorkBook.Font.ColorIndex = 11
$WorkBook.Font.Bold = $True
This block of code creates a new worksheet and places it in the $Sheet variable. Using the $Sheet variable we build the header row of our worksheet. In the $WorkBook variable section, UsedRange is an Excel worksheet property that can be used to set the range of the Excel spreadsheet. Since Excel is now an object in our powershell script, we can utilize Classes, Properties, and Methods of the Excel Com object. I'm not going to turn this into an Excel tutorial but, click here to familiarize yourself with the Methods, Properties, and Classes within Excel . Note: There are no specific examples written for PowerShell (for now) in the MSDN. Since we know that PowerShell is similar to the C# programing syntax, study the C# examples for answers.
We also added some custom formatting (color and bold) to make the header stand out.
$intRow = 2
$colItems = Get-wmiObject -class "Win32_LogicalDisk" -namespace
"root\CIMV2″ `
-computername $strComputer
foreach ($objItem in $colItems) {
$Sheet.Cells.Item($intRow,1) = $objItem.SystemName
$Sheet.Cells.Item($intRow,2) = $objItem.DeviceID
$Sheet.Cells.Item($intRow,3) = $objItem.Description
$Sheet.Cells.Item($intRow,4) = $objItem.FileSystem
$Sheet.Cells.Item($intRow,5) = $objItem.Size / 1GB
$Sheet.Cells.Item($intRow,6) = $objItem.FreeSpace / 1GB
$intRow = $intRow + 1
}
This should look familiar. This is a standard script you would find in the Microsoft PowerShell Script Repository. Write-Host has been removed and replaced with the proper syntax for adding results to cells within the worksheet. The $intRow = 2 starts the data input on row 2, just beneath the header. Each time the script loops through the collection (foreach) we start adding data to a new row. This is done by increasing the $intRow variable by one after each pass ($intRow = $intRow + 1).
$WorkBook.EntireColumn.AutoFit()
Clear
This last bit of code simply auto sizes the columns so that our report looks clean.
Now that you have a basic idea of how to create a report using an Excel spreadsheet, use this script as a template for creating your own custom reports. Utilize the MSDN to assist with more advanced customization. I also encourage you to assist others by sharing your scripts in the PowerShellPro Forum section of this site.
Alternatives to the Microsoft Script Repository examples
I've included the Microsoft examples for a couple of reasons; it's the most utilized site for beginners and because of that I wanted to assist with examples you're already familiar with. As you start to read PowerShell books you will see that different syntaxes exist for solutions. In the following examples I'm going to show how to use the "-property" parameter to yield the same results. We've discussed PowerShell Formatting and Parameters in an earlier tutorial, so let's use these principles to re-write the Microsoft examples we have used thus far.
Using WMI to get BIOS information
In this example we are going to use the "Format-List" cmdlet and the "-Property" parameter to obtain the same information the Microsoft example presented earlier in this tutorial. The following code is what I consider a proper PowerShell syntax. Notice that we are able to retrieve the same information utilizing MUCH less code than the examples in the MS Script Repository. Less code = easier to write and runs more efficient.
Get-WmiObject "win32_BIOS" | Format-List -Property Name,Description,Status,Version
You can now run the code in the console or cut and paste it to a script file. Let's take the new example and create text and Excel reports.
From the console :
Get-WmiObject "win32_BIOS" | Format-List -Property
Name,Description,Status,Version `
| Out-File -Path "C:MyscriptsBIOSinfo.txt"
Open BIOSinfo.txt, were you able to capture the information?
The next example uses the "Export-CSV" cmdlet. We are using the "Select-Object" cmdlet to choose which properties will be captured in the report. For more information on why?Get-Help Export-CSV -full.Hint... in the help file you will notice there is not a "-Property" parameter. Example 1 in the help file shows you how to use the "Select-Object" cmdlet.
Get-WmiObject "win32_BIOS" | Select-Object Name,Description,Status,Version
`
| Export-CSV -Path "C:MyscriptsBIOSinfo.csv"
Open BIOSinfo.csv and verify the data has been captured.
Using a Script:
Save this code to a script called GetBiosInfo.ps1
$strComputer = "."
Get-WmiObject "win32_BIOS" -computer $strComputer `
| Format-List -Property Name,Description,Status,Version
Use a redirect to create a text report:
.GetBiosInfo.ps1 > BIOSRpt2.txt
Open the text file to verify you have captured the information.
You could use a redirect to export to CSV, for example:
.GetBiosInfo.ps1 > BIOSRpt2.csv
But you end up with a one column report. When doing simple reports with Excel I tend to use the "Select-Object" example.
Bonus:
For the fun of it let's capture the results to an .html file.
Get-WmiObject "win32_BIOS" | ConvertTo-HTML -Property
Name,Description,Status,Version `
-title "BIOS INFO" | Format-Table -Auto | Out-File
"C:MyScriptsBIOSRptWeb.html"
Okay, it's a little ugly but browsing the help file for "ConvertTo-Html" cmdlet you will notice some cool parameters that you can use to create good looking html reports (-Head, -Title, -Body, Etc...).
Conclusion
In this tutorial we have looked at how to convert the Microsoft PowerShell Script Repository examples into a format we can use to capture data to a file. We've also found that by using what I consider "proper" PowerShell syntax, we are able to capture the same data using less script code. Why does Microsoft use the long "Write-Host" format for their examples? I can only guess that the format looks familiar to those who are coming from a VBScript background, the code format looks familiar to me