Powershell Statements/Cmdlets
Powershell statements are "commands" to the powershell console.
The purpose of the statements is to tell the powershell what to do.
Command to get powershell version
Execute below command to know powershell version
ps>$host.version
Major Minor Build Revision
----- ----- ----- --------
2 0 -1 -1
Note: You can identify version at the top powershell window.
Aliasing in PowerShell allows for the use of commands we become accustomed
to. Windows users can utilize commands like dir, move, type, cls, etc...
PowerShell also provides a set of aliases for Linux; ls, pwd, mv, man, cat,
etc... PowerShell Aliases are provided for the purpose of allowing new users
the ability to quickly interact with the shell. An alias is an alternative
name assigned to a cmdlet. For example, "dir" is an alias for
"Get-ChildItem." This tutorial presents two types of aliases:
* Built-in Aliases - Predefined alternative names for Windows, Unix, and
PowerShell cmdlets.
* User-defined Aliases - Custom alternative names created by the user.
Launch your PowerShell Console and let's get started.
Built-In PowerShell Aliases
As previously described, built-in aliases are predefined. Use the following
cmdlet to get a list of PowerShell Aliases:
Get-Alias <enter>
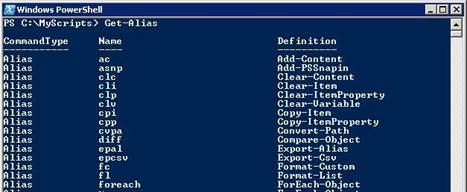
Image 3.1
While browsing through the list, notice that there are multiple Aliases for
the "Get-ChildItem" cmdlet. Windows "dir" command, Unix "ls" command, and a
PowerShell alias "gci" command. No matter which alias you have chosen to
use, typing any one of the aliases will result in the running of the
"Get-ChildItem" cmdlet. Let's test this out, type the following:
dir <enter>
ls <enter>
gci <enter>
Get-ChildItem <enter>
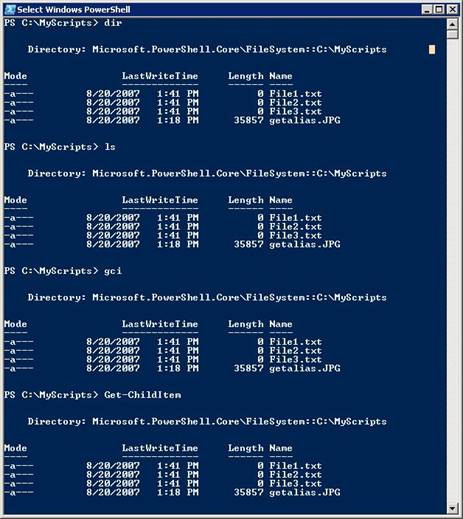
Image 3.2
Listed in Image 3.2, we can verify that each command resulted in the same
output. In essence, we just ran "Get-ChildItem" four times. There is really
not much more to built-in aliases. They exist to assist you while working
in the shell, until you become more familiar with the cmdlets. User-Defined
aliases require a little more attention.
User-Defined PowerShell Aliases
Set-Alias
alias command -
Simple syntax, not much to it. Let's say I want to create a User-Defined
alias for the "Get-Service" cmdlet:
Set-Alias gs Get-Service <enter>
Test your new Alias:
gs <enter>
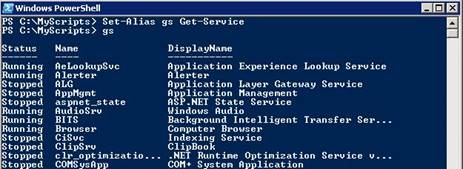
Image 3.3
That was easy, so why does a user-defined alias need a little more
attention? User-defined aliases only last while the PowerShell session is
active. As soon a you quit the session, your alias is gone forever. Close
your PowerShell session and re-launch PowerShell. Attempt to use the "gs"
alias, you will receive the following error:
"The term ‘gs' is not recognized as a cmdlet, function, operable
program, or script file. Verify the term and try again."
O.k. - Recognize the term by creating the alias again:
Set-Alias gs Get-Service
So, we have created a User-defined PowerShell alias and don't want to lose
it when we quit the session, what do we do? There are two options to
explore:
-
Import/Export the PowerShell alias.
-
User-defined Aliases using PowerShell Profiles.
Import/Export User-Defined PowerShell Aliases
The purpose of Importing and Exporting is to make user-defined aliases
available to multiple machines. Say you wrote a script that uses custom
aliases. If you attempted to run your script on another machine, it would
fail. The remote PowerShell session is not aware of the custom aliases you
have created. Unless, you export the aliases to a text file in which the
remote computer could import.
Go ahead and export the "gs" alias using the "Export-Alias" cmdlet:
Export-Alias -Path Aliases.txt <enter>
Since I am running from my home directory "C:\MyScripts" the Aliases.txt
file will be created there. Use the "-Path" parameter to set the desired
location.
One option is to save the export file to a UNC path so that it is
available from a network share.
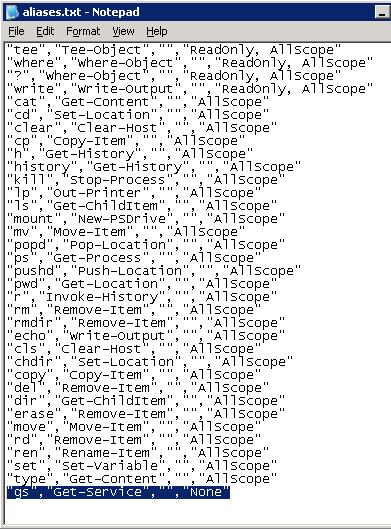
Open "Aliases.txt" in notepad:
PS C:\MyScripts>notepad Aliases.txt <enter>
Do you notice anything odd about the text file?
Export-Alias
Image 3.4
Not only did it export the "gs" user-defined alias we created, it exported ALL PowerShell aliases. Is this an issue? If we attempt to
import the Aliases.txt file, PowerShell will report an error for each alias
that already exists. Import the Aliases.txt file using the "Import-Alias"
cmdlet:
Import-Alias -Path Aliases.txt <enter>

Image 3.5
That looks ugly... but, if the alias does not exist, it will get imported.
There is actually a better way to do this. The example above was shown to
make you aware of a potential problem when you are importing and exporting
aliases. By using the -Name parameter, you can export only the aliases you
choose. So with our "gs" alias let's attempt the following:
Export-Alias -Path Alias.txt -Name gs <enter>
notepad Alias.txt <enter>
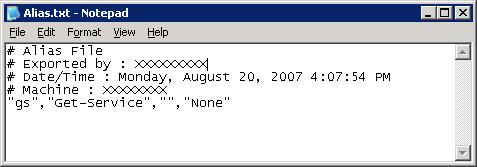
Image 3.6
That looks much better... What do you think would happen if you attempted to
import this file? If your PowerShell Session is still active, you should
get the import error because the "gs" alias still exists in the current
session. Exit your PowerShell session and re-launch PowerShell.
Let's import the Alias.txt file:
Import-Alias -Path Alias.txt <enter>
gs <enter>
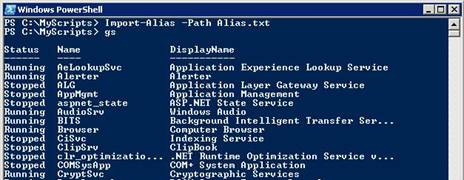
Image 3.7
No error reported when importing the Alias.txt file and entering the "gs"
alias provides us with the output expected.
Importing and Exporting allows for the use of user-defined aliases on local
and multiple systems. What if you just wanted to use custom aliases on your
local system and don't want to be burdened with importing a file each time
you launch PowerShell? PowerShell profiles allow you to customize the
PowerShell environment at launch time. The last section of this tutorial
introduces the PowerShell profile. We are only going to discuss profiles as
it pertains to user-defined aliases. With Profiles, there are many options
to customize your PowerShell environment, which will be covered in this
series.
User-Defined Aliases using PowerShell Profiles
What is a PowerShell Profile? In simplest terms, a profile is a script that
runs at session startup. The location of the Profile is stored in the
$Profile variable, which by default is "My
Documents\WindowsPowerShell\Microsoft.PowerShell_profile.ps1″
To verify the location of your profile type:
$Profile <enter>

Image 3.8
In image 3.8 you can see the path to my profile, which happens to be were
"My Documents" are stored. As already mentioned, the profile is a script
which is denoted by the ".ps1″ extension. All PowerShell scripts are identified by this extension. Since the
profile is a PowerShell script we will need to edit it. You can use any
PowerShell editor, in this tutorial I will be using Notepad. Before editing
the file we need to check the PowerShell execution policy.
When PowerShell is first installed the default execution policy is
"Restricted." This means PowerShell will not run scripts
or configuration files. Here is a list of policy levels:
-
Restricted - We know what this means.
* AllSigned - All scripts and configuration files must be signed by a
trusted publisher.
* RemoteSigned - All scripts and configuration files downloaded from the
Internet must be signed by a trusted publisher.
* Unrestricted - All scripts and configuration files will run. Scripts
downloaded from the Internet will prompt for permission before running.
Use the "Get-ExecutionPolicy" cmdlet to verify policy level:
Get-ExecutionPolicy <enter>
What is your policy set at? By definition, since the profile is a script
file, the execution policy should be set to anything other than
"Restricted." For this exercise you will set your policy to "Unrestricted."
Here is how to set that policy:
Set-ExecutionPolicy Unrestricted <enter>
Now that the policy is set to run scripts, let's create a profile by
following the steps below:
Step 1. Verify existence of a profile.
test-path $Profile <enter>
If the result = False. No profile exists (continue to
step2).
If the result = True. Profile exists (skip steps 2 &
3).
Unless you want to create a new profile, which will delete the current
profile.
Step 2. Create a new profile.
New-Item -Path $Profile -ItemType file -Force <enter>
Step 3. Verify new profile was created.
Repeat step 1. Result should equal "True."
Let's open our new profile in notepad:
notepad $Profile <enter>
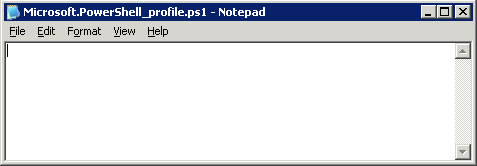
Image 3.9
Isn't that great! We have a blank page! The important thing to note: We
have a script file called "Microsoft.PowerShell_profile.ps1″
This script file will be called using the $Profile variable each time a
PowerShell session is launched. What goes into the script file will be up
to you, how you decide to configure your PowerShell environment. For now,
let's have our profile load our custom user-defined PowerShell alias. Edit
and Save the profile as shown below:
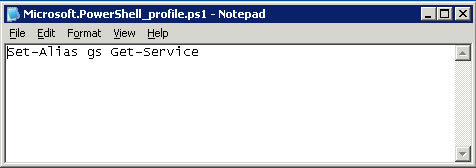
Image 3.10
After you have saved the profile, close notepad, and exit the PowerShell
session.
Launch a new PowerShell session and verify that your custom alias is
functional:
gs <enter>
Viola! your profile has loaded successfully and your alias is working. Use
"Get-Alias" cmdlet to verify the existence of your new alias:
Get-Alias <enter>
-or- a more refined search:
Get-Alias -Name gs <enter>
Hope you enjoyed the Tutorial on PowerShell Aliases, we covered a lot.
Built-in aliases, user-defined aliases, importing aliases, exporting
aliases, a small preview into profiles, and PowerShell script files.